

VAAIG Blog

What's the Best Way to Wash Your Hair—Especially After Dyeing It?
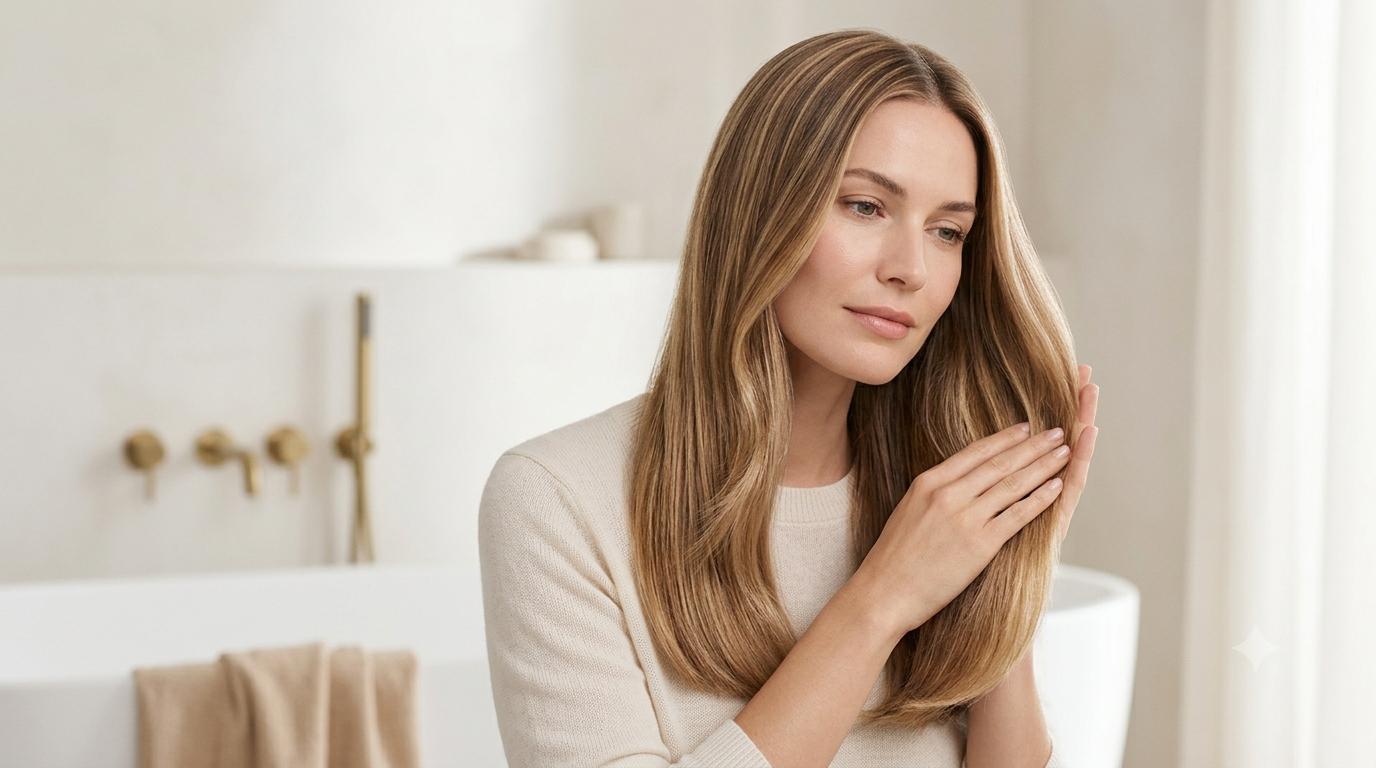
Washing your hair seems simple enough. Most of us have been doing it for years without giving it much thought. But if you've ever struggled with an itchy scalp, dry ends, greasy roots, or hair color that fades too quickly, your washing routine may deserve a second look. What feels like a basic daily habit can actually have a significant impact on the overall condition of your hair and scalp. The truth is, how you wash your hair can affect everything from scalp comfort to the longevity of your hair color. And after coloring your hair, the right washing habits become even more important. Even small changes in your routine can help support healthier-looking hair and a more enjoyable hair care experience. So, what does a scalp-friendly, color-conscious hair washing routine actually look like? Let's take a closer look at the science behind proper hair washing and the simple steps that can help you maintain vibrant, beautiful color for longer. Part 1: The Science of Washing Your Hair Properly Start with lukewarm water—not hot water Hot showers may feel relaxing, but excessively hot water can strip away the scalp's natural oils and leave both the scalp and hair feeling dry. Over time, this may contribute to increased sensitivity, frizz, or a lack of shine. Lukewarm water helps cleanse effectively while preserving moisture balance. It allows shampoo to do its job without unnecessarily disrupting the scalp's protective barrier. This simple habit is especially beneficial for color-treated hair, as it may help maintain the appearance of your chosen shade for longer. Since dyed hair can already be more prone to dryness, avoiding extreme temperatures is a practical way to support its overall condition. Tip: If your scalp feels tight after washing, your water temperature may be too high. Turning the temperature down slightly can make your routine gentler and more comfortable without sacrificing cleanliness. Focus shampoo on the scalp, not the ends Healthy washing starts at the roots. Since the scalp is where oil, sweat, and product buildup accumulate, it deserves the majority of your attention during shampooing. Shampoo is designed to remove excess oil, sweat, and buildup from the scalp. The lather that runs down the hair shaft during rinsing is usually enough to cleanse the lengths of your hair. Scrubbing the ends aggressively can contribute to dryness and breakage over time. Hair lengths, especially if they have been colored or heat-styled regularly, tend to be more delicate and require a gentler approach. Treating your strands gently—especially after coloring—can help preserve softness and keep your hair looking its best. This simple adjustment may also help reduce tangling and improve manageability after washing. Use your finger pads—not your nails Your scalp doesn't need to be "scratched clean." In fact, using your nails can sometimes lead to unnecessary irritation or discomfort, particularly if your scalp is already sensitive. Instead, gently massage your scalp using the pads of your fingers for about one to two minutes. This helps distribute shampoo evenly and lift away buildup without causing unnecessary irritation. Think of it as scalp care rather than deep scrubbing. A gentle massage can also feel relaxing and encourage you to slow down and be more mindful during your routine. A gentle scalp-care routine can support overall comfort and help maintain healthier-looking hair over time. Since healthy-looking hair starts at the scalp, paying attention to this often-overlooked step can make a meaningful difference. Condition from mid-length to ends Conditioner works best where hair tends to be driest. For many people, this means focusing on the mid-lengths and ends rather than the scalp area. Applying it directly to the scalp may weigh down the roots, especially if you naturally produce more oil. This can leave hair looking flat sooner than expected after washing. For most people, focusing on the mid-lengths and ends provides the right balance of moisture and volume. Allowing the conditioner to sit for a few minutes before rinsing may also enhance its benefits. Regular conditioning can also help support smoother, more manageable hair after coloring. Since color-treated hair often requires additional hydration, this step can contribute to a softer feel and a healthier-looking appearance. Part 2: How to Wash Your Hair After Coloring Freshly colored hair needs a little extra attention. The period immediately following a coloring session is an important time to establish habits that support your desired results. The way you care for it during the first few weeks can influence how vibrant and long-lasting your color remains. While no routine can completely prevent fading, thoughtful care can help you enjoy your color for longer. Whether you've visited a salon or chosen the convenience of at-home coloring with a brand like VAAIG, these simple habits can help you get the most out of your new look. A few mindful adjustments can go a long way toward maintaining both color and comfort. Wait before your first wash In general, it's a good idea to wait 24–48 hours after coloring your hair before shampooing. This recommendation is commonly shared by hair care professionals and color enthusiasts alike. This allows the color to settle more completely and helps minimize early fading. Giving your hair a brief pause before the first wash may support a more vibrant appearance. Giving your hair this short resting period can help support better-looking, longer-lasting results. It can also provide an opportunity for your scalp to recover after the coloring process. Wash less frequently if possible Frequent washing can gradually remove color molecules from the hair shaft. While everyone's lifestyle and hair type are different, reducing wash frequency may help preserve your chosen shade. If your lifestyle allows, try spacing out wash days and using dry shampoo between washes when needed. This can be especially helpful for those with color-treated hair who want to extend the time between touch-ups. This approach may help extend the appearance of your color and reduce the need for frequent touch-ups. It may also encourage your scalp to maintain a more balanced oil production over time. Remember, there is no one-size-fits-all schedule. Finding a routine that works for your hair type, activity level, and personal preferences is key. Be gentle with freshly colored hair Colored hair may feel slightly drier than untreated hair. Avoid vigorous towel-drying or aggressive brushing immediately after washing. Instead, gently squeeze out excess water and use a soft towel to blot the hair dry. Small changes in handling can make a noticeable difference over time. Choosing a wide-tooth comb and detangling carefully from the ends upward may also help minimize unnecessary stress on the hair. Extending the same level of care you put into coloring your hair into your daily routine can help keep it looking healthy and vibrant. Consistency in these small habits often contributes to better long-term results. Choosing the Right Products Matters While good washing habits play a major role in maintaining healthy-looking color, the products you choose matter too. If you prefer coloring your hair at home, selecting a formula that aligns with your hair care priorities—whether that's ease of use, scalp comfort, or a more mindful ingredient approach—can make the overall experience more enjoyable. At VAAIG, we believe that coloring your hair should feel like an act of self-expression, not something that comes at the expense of comfort. Our gentle plant-based hair dye is designed for those who want beautiful color while being mindful of their scalp and everyday hair care routine. Because beautiful color doesn't end when the dyeing process is over—it's also about how you care for your hair afterward. Final Thoughts The "perfect" hair washing routine doesn't have to be complicated. In many cases, small adjustments—using gentler techniques, choosing the right water temperature, and adapting your routine after coloring—can help support a healthier scalp and longer-lasting color. When paired with products that suit your individual needs and lifestyle, these habits can help you enjoy a more positive coloring experience from start to finish. So the next time you step into the shower, remember: Washing your hair isn't just a routine. Done well, it's part of caring for both your scalp and your color.
Learn more
Is There a Best Time to Dye Your Hair? 5 Scalp-Friendly Moments You Should Know
Whether you're covering grays, refreshing your current shade, or trying something completely new, hair dyeing has become a powerful form of personal expression. It’s not just about choosing a color anymore—it’s about how that color fits your lifestyle, your confidence, and even your overall hair health. But one factor that’s often overlooked is timing. The condition of your scalp, your body, and your environment can all subtly influence not only how your hair reacts to dye, but also how comfortable the entire experience feels. So instead of asking what color should I choose next?, a better question might be:Is there actually a “right time” to dye your hair? Understanding this can make a noticeable difference in both scalp comfort and final color results. This article explores that idea through different real-life situations where hair dyeing tends to feel more comfortable, predictable, and scalp-friendly. When your scalp feels healthy and calm The best time to dye your hair is when your scalp feels stable, calm, and healthy. If you’re experiencing irritation, cuts, eczema, active dandruff flare-ups, or general scalp sensitivity, it’s usually better to wait. Many traditional hair dyes contain chemical ingredients that can be more irritating when the skin barrier is already compromised. With that in mind, it’s worth noting that VAAIG is designed with a gentler approach in mind, focusing on reducing unnecessary harshness commonly found in conventional formulations. This means you can feel more confident and at ease when choosing to color your hair, even at home. 👉VAAIG Ingredient Lab A calm, balanced scalp not only creates a more comfortable coloring experience, but also often contributes to more even and predictable results. 24–48 hours after washing your hair It may sound counterintuitive at first, especially since most people assume that cleaner hair always equals better results, but freshly washed hair isn’t always the ideal base for coloring. In reality, washing your hair right before dyeing removes much of the scalp’s natural oils. These oils form a very thin, protective layer that helps buffer the skin from direct contact with dye chemicals. Without this layer, the scalp can feel more exposed, which may increase the chance of tingling, dryness, or irritation during the coloring process—especially for those with sensitive skin. On the other hand, waiting too long after washing isn’t ideal either. As natural oils, sweat, and styling product residue build up over several days, they can create a slight barrier on the hair surface. This buildup may interfere with how evenly the dye spreads and absorbs, sometimes leading to patchy or less consistent color results. The sweet spot is usually:Dye your hair about 1–2 days after washing it. At this point, your scalp still has enough natural protection, while your hair remains clean enough to allow smooth, even color application. During mild, stable weather conditions Environment matters more than most people think. Hot weather can increase sweating and oil production, which may affect how dye develops and fades. Cold, dry conditions can leave the scalp feeling tight or sensitive. That’s why many people find spring and autumn to be the most comfortable seasons for hair coloring. In general:Moderate temperature + stable humidity = a more predictable coloring experience. When your body feels well-rested and balanced Your overall physical condition has a bigger impact on hair coloring than many people expect. When you're tired, stressed, sick, or sleep-deprived, your body becomes more sensitive to external triggers—including hair dye. This can make your scalp slightly more reactive than usual, sometimes leading to mild tingling or discomfort during the process. You don’t need to reschedule every time you feel a bit off, but it’s helpful to notice your body’s condition before coloring your hair. A well-rested body usually means a more balanced system and a calmer scalp, which often leads to a more comfortable and predictable coloring experience. When hormones are stable (especially for women) Hormonal changes can have a noticeable impact on skin behavior, including scalp sensitivity. During menstrual cycles or other periods of hormonal fluctuation, the skin’s tolerance level may temporarily shift. Some people report feeling more sensitive than usual during cosmetic treatments, including hair dyeing—such as increased tingling, mild discomfort, or a lower threshold for irritation. While coloring your hair during this time is not harmful, it can simply feel less comfortable for some individuals due to these temporary changes in the body. Because of this, many people prefer to schedule their coloring appointments when their body feels more balanced and stable. Ultimately, it comes down to personal comfort and awareness of how your skin typically responds at different times in your cycle. When it’s better to wait It’s usually best to postpone hair dyeing if you are: Experiencing scalp wounds or infections Recovering from recent bleaching or chemical treatments Dealing with an allergic reaction or irritation Extremely fatigued or unwell In a post-illness recovery phase Giving your scalp time to recover often leads to better long-term hair health. Final thoughts Hair dyeing is more than a beauty choice—it’s also a form of self-care. While choosing the right color is exciting, choosing the right timing can make a noticeable difference in comfort, scalp health, and overall results. When your scalp feels balanced, your body is rested, and your environment is stable, hair coloring becomes not just a transformation—but a more mindful experience. VAAIG focuses on creating a more comfortable and thoughtful hair-dyeing experience, combining gentle formulation thinking with practical usability. The goal is to help people enjoy color expression with greater ease, confidence, and scalp comfort. Before your next appointment, it might be worth asking:Is my scalp ready for this moment?
Learn more
Best Hair Colors to Look Younger in 2026 (Anti-Aging Guide)
As we move into 2026, hair color is no longer just about covering greys or changing style. It has become one of the most powerful tools for creating a softer, fresher, more youthful appearance — without surgery, filters, or drastic changes. The right hair color can: brighten your complexion soften facial features reduce signs of fatigue blend grey roots naturally create a healthier overall look But the wrong shade can easily do the opposite — making the face look harsher, older, or more tired. So the goal isn’t just “covering grey hair.” It’s choosing a color that makes you look naturally younger. Why Hair Color Affects How Young You Look Hair color directly impacts how your skin tone is perceived. Darker or overly flat tones can increase contrast, which often highlights: fine lines dullness in the skin under-eye shadows On the other hand, softer and more dimensional shades tend to: reflect light better soften facial contrast create a more lifted, healthy appearance That’s why professional colorists rarely rely on a single flat shade for mature hair. Instead, they focus on dimension and softness. Best Hair Colors to Look Younger in 2026 Here are the most flattering hair color directions for a more youthful appearance in 2026. 1. Soft Brown Soft brown is one of the most universally flattering shades. It’s not too dark, not too light — just enough depth to: soften facial features reduce harsh contrast blend grey roots naturally This is often the safest “anti-aging” hair color choice. 2. Mocha Brown Mocha brown adds a slightly richer tone while still staying soft and natural. It works especially well if you want: more depth than light brown but without going into harsh dark black territory It creates a polished, healthy-looking finish that feels effortless. 3. Warm Dark Blonde Warm dark blonde adds brightness around the face, which can instantly make the skin look more radiant. It helps: reduce the appearance of tiredness soften age-related contrast add dimension without heaviness This shade is especially popular for a “fresh but natural” look. 4. Soft Black (Not Jet Black) Black hair can be tricky. But soft black — not overly harsh or blue-toned — can still look elegant and youthful when done correctly. The key is avoiding: overly flat pigment harsh shine unnatural depth A softer black creates structure without aging the face. Hair Colors That Can Make You Look Older Just as some shades refresh your look, others can unintentionally add years. 1. Jet Black While dramatic, jet black often creates too much contrast, especially on lighter or mature skin tones. This can emphasize: fine lines tiredness lack of skin brightness 2. Overly Ashy Tones Very cool, flat ash tones can sometimes drain warmth from the face, making skin appear less vibrant. 3. One-Dimensional Color Flat, single-tone hair color (no highlights or variation) often looks less natural and more artificial. Modern “youthful” color always has dimension. Grey Coverage Without a Harsh Look One of the biggest concerns for mature hair is grey regrowth. But covering greys doesn’t have to mean heavy, opaque color. The most natural results come from: softer pigment layering root-focused application natural blending instead of full coverage overload This is especially important for people who color their hair frequently and want to avoid scalp discomfort or dryness. Many modern at-home color systems now focus on professional-level coverage with a gentler experience, designed for people who want both performance and comfort. How to Choose the Right Hair Color for a Younger Look When selecting a hair color in 2026, focus on three key principles: 1. Softness over darkness Avoid overly deep, harsh tones. 2. Dimension over flatness Multi-tonal color always looks more natural and youthful. 3. Balance over intensity The goal is enhancement, not transformation. Final Thoughts Looking younger through hair color isn’t about chasing trends or dramatic changes. It’s about choosing shades that bring balance back to your overall look — softening contrast, enhancing glow, and blending greys in a natural way. Because in 2026, the most youthful hair color isn’t the darkest or the brightest. It’s the one that looks like it belongs to you. VAAIG-Rich, salon-quality coverage with a gentler, scalp-friendly experience. For people who color their hair regularly, especially those with sensitive scalps or frequent grey regrowth, choosing a formula that balances professional color performance with scalp comfort is becoming increasingly important. Modern salon-inspired home hair color systems are now designed to deliver: natural-looking coverage softer regrowth blending reduced scalp irritation healthier-looking shine Without compromising on color results.
Learn more
How to Cover Grey Roots at Home Naturally
Grey roots have a way of showing up at the worst possible time. A few strands around the part line quickly turn into visible regrowth, and before long, many people feel stuck in an endless cycle of salon appointments, root touch-ups, and rushed at-home fixes. For people with sensitive scalps, it becomes even more frustrating. Because sometimes the problem isn’t covering grey hair — it’s dealing with everything that comes after: scalp irritation dryness harsh chemical smell uneven color overly dark, flat-looking roots That’s why more people are looking for a way to cover grey roots naturally at home — without sacrificing comfort, shine, or healthy-looking hair. And contrary to what many people think, natural-looking grey coverage isn’t about making hair look “perfectly dyed.” It’s about making it look effortlessly healthy. Why Grey Roots Are Harder to Cover Grey hair behaves differently from pigmented hair. As hair loses melanin, it often becomes: coarser drier more resistant to color absorption This is especially noticeable around the hairline and temples, where greys tend to be the most stubborn. To compensate, many traditional box dyes rely on stronger chemical systems and heavier pigment deposits to force color into the hair. The result? You may get coverage — but often at the expense of: scalp comfort softness natural dimension long-term hair health That harsh “freshly dyed” look many people dislike usually comes from overly heavy color saturation, especially with very dark shades. Why Some At-Home Hair Color Looks Unnatural One of the biggest mistakes people make when covering greys is choosing a color that’s too dark. Jet black shades can sometimes create: harsh contrast against the skin flat-looking roots visible regrowth lines an artificial “shoe polish” effect in sunlight That’s why many professional colorists prefer softer, more dimensional shades for grey coverage, such as: Soft Black Dark Brown Mocha Brown Ash Brown These tones tend to blend more naturally with existing hair while softening the contrast as roots grow back in. Because the goal isn’t to make hair look heavily colored. It’s to make it look naturally polished. The Secret to Natural Grey Coverage at Home Natural-looking root touch-ups are usually less about covering everything completely — and more about balance. Especially for people who color regularly. If every touch-up leaves the scalp irritated and the ends drier than before, the process becomes exhausting over time. That’s why more people are moving away from traditional harsh box dyes and looking for formulas that prioritize both: professional-level color payoff and scalp comfort At-home hair color has evolved a lot in recent years. Many modern salon-inspired formulas are designed to deliver rich, even color while being gentler on the scalp and hair. Especially for people who deal with frequent root maintenance. 1. Focus on the Roots — Not the Entire Head One of the most common mistakes in DIY hair coloring is re-dyeing the entire head every time grey roots appear. In reality, most of the time, only the regrowth area needs fresh color. Repeatedly pulling permanent dye through the lengths can lead to: dry ends dull-looking color unnecessary damage heavy pigment buildup Professional root touch-ups are usually much more targeted. The goal is seamless blending — not repeatedly over-processing healthy hair. 2. Don’t Wait Until the Greys Become Too Visible Covering greys early often creates a softer, more natural result. When roots are only about 1–2 cm grown out: color blends more evenly the transition looks smoother less aggressive processing is usually needed This is also much kinder to the scalp over time, especially for people who touch up frequently. 3. Choose a Formula That Balances Color and Comfort For a long time, many people assumed that strong color results had to come with strong irritation. But professional-quality hair color today is increasingly focused on balance. Because modern consumers care about more than just coverage. They also care about: how their scalp feels afterward whether the color looks dimensional how soft the hair stays whether the smell is overwhelming how healthy the hair looks in natural light That’s one of the reasons we created our color formula around the idea of: professional-level color — without treating scalp comfort as a compromise The goal was never just to cover greys. It was to create rich, salon-quality color with a softer experience for people who color their hair regularly. Especially those with sensitive scalps who are tired of the usual tradeoff between color performance and comfort. Why More People Are Switching to Premium At-Home Hair Color People are starting to realize that at-home coloring doesn’t have to feel like “damage control.” The new generation of premium home hair color is much more focused on: natural-looking shine softer regrowth blending lower irritation healthier-looking texture more refined color results Instead of simply making hair darker. Especially for grey coverage, the difference becomes noticeable over time. Because when someone colors their roots month after month, comfort matters just as much as pigment. Natural Grey Coverage Shouldn’t Look Overdone The best root touch-ups usually go unnoticed. Not because the hair looks unnaturally dark or overly processed — but because it simply looks healthy, soft, and polished. Natural grey coverage should never feel: heavy flat overly harsh painfully chemical obviously dyed And increasingly, people are realizing they shouldn’t have to sacrifice scalp comfort just to maintain beautiful color. Because great hair color isn’t only about covering greys. It’s about how your hair — and your scalp — feel afterward.
Learn more
How to Dye Hair Without Damaging It (Even at Home)
Hair dye has a reputation for causing dryness, breakage, and rough texture — but damaging your hair during coloring is not inevitable. In many cases, hair damage happens because of harsh formulas, incorrect application, or overprocessing the hair too often. The good news is that with the right techniques and gentler products, it’s possible to color your hair at home while keeping it soft, healthy-looking, and manageable. In this guide, we’ll explain what actually causes hair damage during coloring, how to reduce it, and what to look for in a lower-damage hair dye routine. Why Does Hair Dye Damage Hair? Hair dye works by opening the hair cuticle so color pigments can enter the hair shaft. This process can weaken the hair over time — especially when strong chemicals or repeated coloring are involved. The most common causes of hair damage include: High ammonia levels Strong peroxide developers Frequent bleaching Overlapping color on already processed hair Leaving dye on too long Poor post-color care Not all hair dyes cause the same level of damage, and some formulas are significantly gentler than others. Signs Your Hair Is Being Damaged by Hair Dye If your hair feels different after coloring, your hair structure may be under stress. Common signs include: Dry or rough texture Increased tangling Split ends Breakage during brushing Loss of shine Hair feeling “stiff” after dyeing These symptoms are especially common with repeated coloring or aggressive lightening. How to Dye Hair Without Damaging It Here are some of the most effective ways to reduce damage while coloring your hair at home. 1. Choose a Gentler Hair Dye Formula One of the biggest factors is the formula itself. Harsh dyes with strong chemical smells often contain higher levels of ammonia or aggressive developers that can strip moisture from the hair. If your goal is healthier-looking color, look for: Lower-odor formulas Conditioning ingredients Sensitive scalp-friendly systems Salon-inspired at-home color kits Gentler formulas can help reduce both scalp irritation and hair dryness. 2. Avoid Bleaching Unless Necessary Bleach is one of the most damaging processes for hair because it removes natural pigment from inside the hair shaft. The more lifting involved, the higher the risk of: Brittleness Breakage Dry texture Staying closer to your natural shade is usually safer for maintaining healthier hair. 3. Don’t Overlap Permanent Dye Repeatedly A very common mistake is applying permanent dye over the full length of the hair every time. In most cases, only the roots need fresh color. Repeatedly processing previously dyed hair can lead to: Uneven texture Weakness Excess dryness For regular maintenance, root touch-ups are often enough. 4. Follow Processing Time Carefully Leaving dye on longer does not always improve color results. Overprocessing can: Dry out the hair cuticle Increase roughness Make hair more fragile Always follow the timing instructions recommended for the product. 5. Prepare Your Hair Before Coloring Healthy hair handles coloring better than dry or damaged hair. Before dyeing: Avoid excessive heat styling Use hydrating conditioners regularly Don’t wash hair immediately before coloring Minimize harsh clarifying shampoos A healthier starting point helps reduce stress during the coloring process. 6. Use Color-Safe Hair Care After Dyeing Post-color care matters just as much as the coloring process itself. After dyeing: Use sulfate-free shampoo if possible Reduce excessive heat styling Use nourishing masks or conditioners Avoid washing hair too frequently This helps maintain softness and color longevity. Can At-Home Hair Dye Be Safe for Hair? Yes — when used correctly, at-home hair dye does not automatically ruin your hair. Modern salon-inspired formulas are designed to provide: Better conditioning More even color payoff Lower irritation Softer finish after coloring The key is choosing the right formula and avoiding repeated overprocessing. Hair Dye Damage vs Healthy-Looking Color There’s a common belief that stronger dye always means better results. But in reality, healthy-looking shine, softness, and smoothness often make hair color look more expensive and natural. Hair that feels healthy usually reflects color better as well. Final Thoughts Coloring your hair does not have to mean sacrificing hair quality. Most dye-related damage comes from overly harsh formulas, excessive processing, or poor aftercare — not simply from coloring itself. With gentler products, smarter application techniques, and proper maintenance, it’s possible to achieve rich, salon-inspired color at home while keeping your hair looking soft and healthy. Beautiful color should not come at the cost of your hair health. FAQ Does all hair dye damage hair? Most permanent dyes cause some level of stress to the hair, but gentler formulas and proper technique can significantly reduce damage. What type of hair dye is least damaging? Lower-ammonia, conditioning, and salon-inspired formulas are generally gentler on the hair. Is bleaching more damaging than regular hair dye? Yes. Bleaching removes natural pigment and is usually more aggressive than standard coloring. How often should I dye my hair? It depends on hair growth and color maintenance, but many people only need root touch-ups every few weeks instead of full recoloring. Can damaged hair still be dyed? It can, but heavily damaged hair should be treated carefully to avoid further breakage.
Learn more
Why Box Dye Makes Your Head Itch (And What You Can Do About It)
If your scalp feels itchy, tingly, or even slightly burning after using box hair dye, you’re not imagining it. This is a very common experience — and in most cases, it’s a sign that your scalp is reacting to certain ingredients in the formula. While mild tingling can sometimes be normal during hair coloring, persistent itching or discomfort usually means your scalp is sensitive to the chemicals in the dye. In this article, we’ll break down exactly why box dye can make your head itch, what ingredients are usually responsible, and what you can do to reduce irritation or avoid it altogether. Why Does Box Hair Dye Make Your Scalp Itch? Box hair dye often contains strong chemical ingredients designed to deliver fast and long-lasting color results. These ingredients can sometimes irritate the scalp, especially if your skin is sensitive. The most common causes include: 1. Ammonia (Strong Odor + Irritation) Ammonia is used in many permanent hair dyes to open the hair cuticle so color can penetrate deeply. However, it can also: Disrupt the scalp’s natural barrier Cause dryness and irritation Create a strong smell that some people react to For sensitive scalps, ammonia exposure is one of the most common triggers for itching. 2. Hydrogen Peroxide (Developer Strength) Hydrogen peroxide helps activate the dye and lighten natural pigment. But higher concentrations can: Dry out the scalp Cause a stinging or warm sensation Increase sensitivity during processing The stronger the formula, the higher the chance of discomfort. 3. Fragrance Ingredients Many box dyes include synthetic fragrances to mask chemical smells. While this improves user experience, fragrance is also: One of the most common skin irritants A frequent trigger for allergic reactions or itching People with sensitive skin often react to fragrance without realizing it. 4. PPD (Para-Phenylenediamine) PPD is a key ingredient in many permanent hair colors, especially darker shades. It helps achieve long-lasting, natural-looking color — but it can also: Trigger allergic reactions in some users Cause itching, redness, or swelling in sensitive individuals If you consistently experience scalp irritation after dyeing, PPD sensitivity could be a factor. Is It Normal for Hair Dye to Itch? A slight tingling sensation during hair coloring can sometimes be normal, especially with permanent dyes. However, you should pay attention if you experience: Strong or increasing itchiness Burning sensations Redness or inflammation Discomfort that continues after rinsing These are signs that your scalp may be reacting to the formula rather than simply adjusting to the process. Box Dye vs Sensitive Scalp Reactions Not everyone reacts the same way to hair dye. People are more likely to experience itching if they have: Naturally sensitive skin A dry or compromised scalp barrier Previous reactions to hair products Frequent dyeing habits (over-processing) Box dyes are often formulated for broad use, which means they may not be optimized for highly sensitive scalps. How to Reduce Scalp Irritation When Coloring Hair If you still want to color your hair but want to avoid discomfort, here are some helpful steps: 1. Always Do a Patch Test Test the product on a small area 48 hours before use. 2. Avoid Washing Hair Right Before Dyeing A slightly natural oil layer can help protect the scalp. 3. Choose Lower-Irritation Formulas Look for: Ammonia-free options Lower fragrance levels Sensitive scalp-friendly products 4. Don’t Overprocess the Hair Follow timing instructions carefully — leaving dye on longer does not improve results. 5. Focus on Root Touch-Ups Only Avoid repeatedly applying dye across the entire scalp when not necessary. What to Use Instead of Traditional Box Dye If your scalp reacts every time you color your hair, it may be worth switching to gentler formulas designed specifically for sensitive users. Modern salon-inspired hair color systems are now designed to balance: High color performance Lower scalp irritation Better hair condition after dyeing This means you don’t necessarily have to choose between color quality and scalp comfort anymore. Final Thoughts If box dye consistently makes your head itch, it’s not something you should ignore. Your scalp is simply telling you that the formula may be too strong or not suitable for your skin type. Understanding what causes irritation — and choosing gentler alternatives — can make at-home hair coloring a much more comfortable experience. Healthy color should not come at the cost of scalp comfort. FAQ Why does my scalp itch after hair dye? Most often due to ammonia, peroxide, fragrance, or PPD sensitivity. Is it normal for hair dye to burn slightly? Mild tingling can happen, but burning or persistent itching is not normal. What hair dye is best for sensitive scalp? Look for low-irritation, ammonia-free formulas designed for sensitive skin. Can I still dye my hair if I have a sensitive scalp? Yes, but you should choose gentler formulas and always do a patch test.
Learn more