

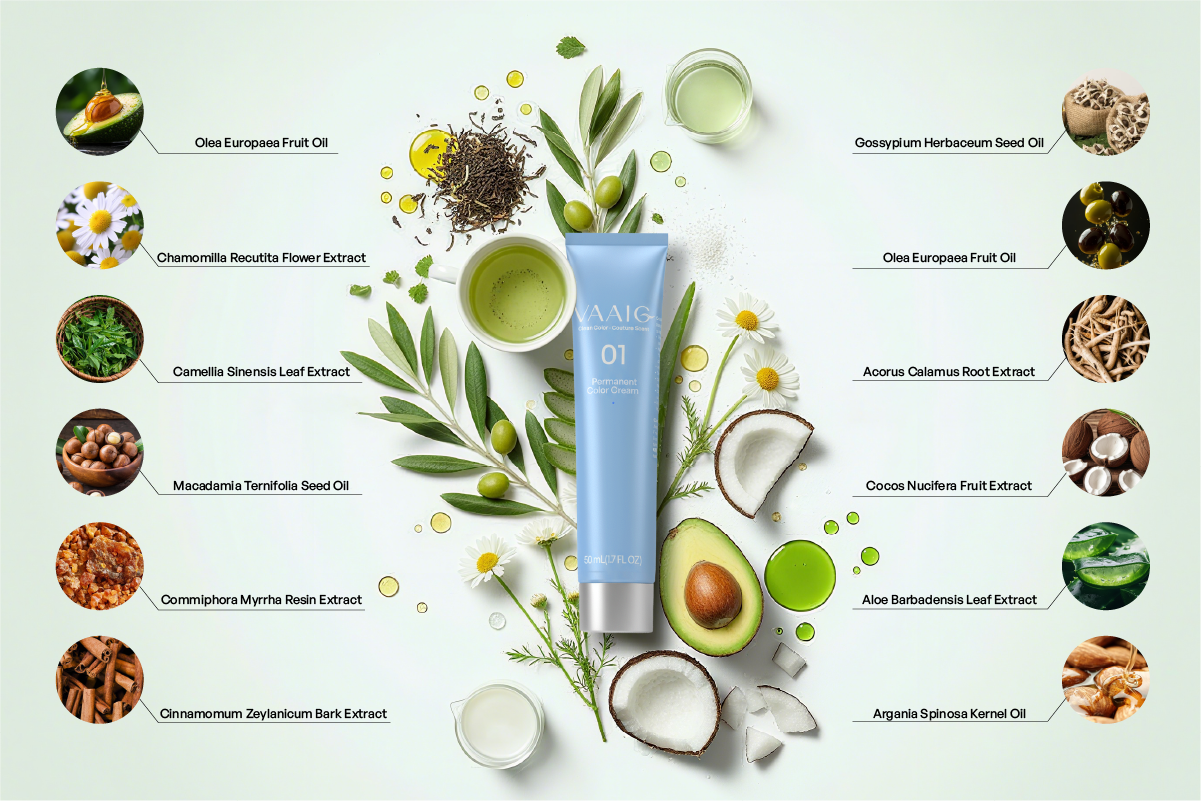
While pursuing trendy hair colors, have you ever worried about the damage chemical hair dyes might cause to your hair? Vaaig’s newly launched botanical hair dye will completely change your perception of coloring. We carefully blend 12 natural ingredients to not only give you your ideal hair color but also provide an exceptional care experience during the coloring process. Below, we explain from a scientific perspective why we’ve chosen to incorporate these nourishing ingredients into Vaaig Hair Dye.
Argania Spinosa Kernel Oil Lightweight gloss & smoothness; helps reduce rough feel after rinse.
Argan oil is rich in vitamin E and natural fatty acids, which smooth the hair cuticle—earning it the nickname “liquid gold.” When light reflects off the smoothed surface, it creates a natural and high-end gloss. This is exactly what Vaaig aims to achieve with “lightweight gloss.” Additionally, argan oil penetrates deeply into the hair shaft, repairing it from within by filling in damaged cuticle gaps.
It doesn’t just “mask” damage—it actively repairs and prevents it, ensuring that each coloring session is a luxurious treatment rather than a compromise on hair health. This reflects Vaaig’s commitment to quality and user experience: beauty shouldn’t come at a cost.
Olea Europaea (Olive) Fruit Oil Emollient softness; supports a supple, conditioned look.
Olive oil is an excellent emollient. Unlike some oils that merely sit on the surface, its small molecules allow it to penetrate deeply, nourishing the hair from within and restoring its softness and elasticity—this is the true meaning of “emollient softness.”
It also forms a lightweight, breathable protective layer around each strand, preventing moisture loss and keeping hair hydrated long after coloring, thus avoiding dryness and brittleness. Working in synergy with ingredients like aloe extract, it locks in moisture while other components provide hydration, resulting in a fresh, hydrated feel.
Butyrospermum Parkii (Shea) Butter Rich conditioning; helps tame frizz and dryness.
Shea butter deeply penetrates the hair shaft, filling gaps caused by damage and providing rich conditioning from within—unlike surface-level coatings. Its rich texture smooths and seals the cuticle, forming a protective layer that instantly enhances smoothness and shine while locking in moisture. This is the science behind “taming frizz and dryness.”
Including shea butter sets Vaaig apart from ordinary hair dyes. It doesn’t offer temporary camouflage but fundamental improvement, ensuring that post-color hair isn’t just vibrant but also soft, strong, and healthy.
Macadamia Ternifolia Seed Oil Silky slip for easier comb-through and even spread.
Macadamia oil is a lightweight, fast-absorbing precious oil with a fatty acid profile similar to human sebum. Its addition makes the dye easier to apply, enhancing usability and ensuring a smooth, effortless experience.
Thanks to its small molecular structure, it absorbs quickly without leaving a greasy residue. It restores hair’s natural flexibility and elasticity, reducing breakage caused by dryness and making hair appear healthier and stronger.
Macadamia oil is key to Vaaig’s triple goal of smooth application, even color distribution, and deep nourishment—turning coloring from a chore into a pampering experience.
Gossypium Herbaceum (Cotton) Seed Oil Soft-touch finish; cushions friction during processing.
Cottonseed oil is a lightweight, absorbent vegetable oil that plays a focused role in “process protection” and “touch enhancement.”
By smoothing the cuticle and forming a protective film, it helps lock color pigments within the hair shaft, reducing premature fading during rinsing and supporting color longevity. It doesn’t repair after the fact—it protects during the process. Its main value lies in buffering chemical and physical damage while the dye is on your hair.
Cottonseed oil is the low-key “guardian” in Vaaig’s formula, ensuring your hair is tenderly cared for every step of the way to beautiful color.
Cocos Nucifera (Coconut) Fruit Extract Creamy comfort; a cushioned, conditioning feel.
Coconut oil’ low molecular weight and straight-chain fatty acid structure allow it to penetrate the hair cortex deeply—unlike many surface-level oils. It works in synergy with macadamia oil to enhance slip, ensuring the dye spreads evenly for streak-free color.
By preventing protein loss and moisturizing the hair, coconut extract significantly strengthens hair resilience, reducing split ends and breakage for stronger, healthier post-color hair.
Coconut extract is one of Vaaig’s core ingredients for truly nourishing hair during coloring. It ensures your hair remains healthy and vibrant after chemical processing, not hollow and fragile.
Aloe Barbadensis Leaf Extract Fresh, hydrated feel; comforts the look of dry lengths.
Aloe is renowned for its powerful hydrating and moisturizing properties, delivering exceptional moisture retention and hydration. It provides an instant, fresh burst of hydration to the scalp and hair, effectively countering the dryness, heat, and tightness that dyeing might cause—making the process more comfortable. Its polysaccharides form a lightweight moisturizing film that prevents moisture loss.
But it does more: aloe also soothes and calms. Its anti-inflammatory compounds (like aloin and anthraquinones) help reduce potential irritation, redness, and discomfort during dyeing, making the product gentler overall.
In short, aloe ensures that using Vaaig isn’t just about color—it’s a fresh, hydrated, and soothing scalp treatment. It transforms dyeing from a damaging process into a pursuit of beauty and health.
Chamomilla Recutita (Matricaria) Flower Extract Calming, soft-focus shine; gentle, easy-to-wear finish.
Chamomile, long known as the “plant’s physician,” is celebrated for its soothing, anti-inflammatory, and reparative properties. Its inclusion goes beyond concept—it adds gentleness, shine, and a premium touch.
It provides not a glaring, mirror-like shine but a soft, hazy, high-end glow that visually softens flaws like frizz and unevenness, making color look fuller and more textured—as if filtered by natural soft light. For light or brown hair, its natural flavonoids enhance golden tones and brightness for a warmer, more natural radiance.
Chamomile extract is key to Vaaig’s promise of “calming, soft-focus shine; gentle, easy-to-wear finish.” It ensures dyed hair isn’t just beautifully colored but also healthy, soft, and elegant from within.
Camellia Sinensis Leaf Extract (Tea) Light-reflective gloss; antioxidant support.
Tea extract is more than just a “plant ingredient”—it’s a multifaceted protector, offering benefits from instant shine to long-term defense.
It forms a fine, transparent protective layer on the hair surface, smoothing the cuticle for exceptional sleekness. Green tea extract, in particular, is rich in catechins—potent natural antioxidants. This is its core function: “antioxidant support.” Tea also has anti-inflammatory properties that help calm the scalp during dyeing, maintaining scalp health for long-term hair growth.
Tea extract ensures that your Vaaig color isn’t just stunning initially but remains vibrant and lasting. It embodies Vaaig’s advanced philosophy of focusing not just on immediate results but also on long-term, intelligent care.
Commiphora Myrrha Resin Extract (Myrrh) Polished look & protective feel.
Myrrh is a resin treasured since ancient times for its protective and restorative properties. It forms an ultra-thin, luminous film on the hair surface that smoothes and fills the cuticle for exceptional sleekness.
By sealing the cuticle, this protective layer helps lock dye molecules inside the hair, slowing color fading caused by washing and daily friction, thus maintaining vibrancy and longevity. Myrrh also has natural antibacterial properties that help maintain a healthy scalp microbiome, providing a cleaner foundation for hair health.
Myrrh resin extract is key to Vaaig’s promise of a “polished look & protective feel.” It elevates dyeing from mere color change to a ritual of cloaking hair in luxurious protection, offering an extraordinary, almost sacred care experience.
Cinnamomum Zeylanicum Bark Extract Purified, refreshed feel on lengths and scalp area.
Cinnamon is more than a spice—its extract is valued in skincare and haircare for its unique biological activity. It offers a purified, invigorating sensory experience.
It has mild stimulating properties that promote microcirculation in the scalp. Better blood flow means more oxygen and nutrients reach hair follicles, maintaining scalp vitality and providing a refreshing sensation during dyeing rather than a heavy chemical feel. Cinnamon also boasts strong natural antibacterial and antifungal properties that help balance scalp flora, purify the environment, and reduce potential irritants—aligning with the “purified” sensation.
Thus, cinnamon bark extract ensures that using Vaaig isn’t just about coloring—it’s an invigorating journey that awakens the senses, purifies the scalp, and delivers a whole-body refresh. It turns dyeing into an active, rejuvenating ritual.
Acorus Calamus Root Extract Smoothing, neat finish; supports manageability.
Calamus is a plant highly regarded in traditional Ayurvedic and Chinese medicine, its root extract rich in active compounds.
It effectively smooths the hair cuticle and forms a thin protective film on the strand surface. In traditional medicine, calamus root is also used for soothing. Applied to the scalp, it may deliver a cool, calming sensation that helps ease minor tension during dyeing.
Calamus root extract is the finishing touch to Vaaig’s promise of a “smoothing, neat finish; supports manageability.” It ensures users gain not only vibrant color but also impeccable smoothness and unparalleled ease of management, minimizing daily styling effort and making beauty simple.
Experience the Vaaig Difference
Vaaig Hair Dye is more than just a coloring product—it’s a luxurious hair care experience. We insist on natural ingredients to ensure you receive deep nourishment and protection while achieving your desired shade. Whether covering grays or trying a trendy color, Vaaig offers the perfect solution.
Say goodbye to dryness and damage, and embrace healthy radiance! Choose Vaaig—transform your hair coloring experience today.
Friendly reminder: Please perform a patch test before use to ensure suitability. For detailed instructions, refer to the product packaging.


